Create 3D Shapes using MeshView.
If you look at the core classes you will see that JavaFX defines three 3D shapes; the box, cylinder and sphere but what if you want to create yur own 3D shape. This page will show you how to use the MeshView class to create the pyramid shown here.
To create the pramid there are several steps to go through. The first is define the vertices, texture coordinates and triangles that make up our 3D shape.
The Vertex Coordinates
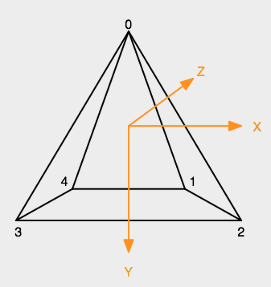
The image on the right shows that our pyramid has just 5 vertices. The first thing to notice in this diagram is the XYZ axis used by JavaFX, the X axis points to the right as you might expect but the Y axis points down and the Z axis points away from you, which is the opposite of that used in OpenGL. In fact they both use the right-hand-coordinate system, the only difference being a 180° rotation about the X axis.
Note that the front face of the pryamid is defined by the vertices {0 3 2} and the rear face by the vertices {0, 1, 4}.
So now we are ready to define the vertices. In this code we first create a Mesh object and then add our vertices.
TriangleMesh mesh = new TriangleMesh();

// Vertex coordinates
float h = 210;    // Height (Y)
float w = 245;    // Width (X)
float d = 125;    // Depth (Z)

 mesh.getPoints().addAll(
    0,      -h / 2,   0,        // 0
    w / 2,  h / 2,    d / 2,    // 1
    w / 2,  h / 2,    -d / 2,   // 2
    -w / 2, h / 2,    -d / 2,   // 3
    -w / 2, h / 2,    d / 2     // 4
);
The code starts by creating a TrianleMesh object to hold the mesh data, then adds the XYZ coordinates for each of the five vertices. The numbers in the code match the diagram above.
The Texture Coordinates
Although we can simple paint our pyramid with a solid colour the fun comes when we apply a texture and in this program we have used the image below.
A texture coordinate is expressed using 2 values [u, v] where u is the horizontal coordinate position and v the vertical coordinate position. Note that corners of an image are defined by the texte coordiantes
| Position | [u, v] |
|---|---|
| Top-left corner | [0.0, 0.0] |
| Bottom-left corner | [0.0, 1.0] |
| Bottom-right corner | [1.0, 1.0] |
| Top-right corner | [1.0, 0.0] |
Just because u and v have the same range doesn't mean that the image has to be square, the coordinates represent a proportion of the width and height not the actual pixel position.
Click on the image and it will show the 10 texture coordinates we will use with our pyramid.

Now we have the texture coordinates we can add them to our mesh.
// Add texture coordinates
mesh.getTexCoords().addAll(
        0.504f, 0.524f,     // 0
        0.701f, 0,          // 1
        0.126f, 0,          // 2
        0,      0.364f,     // 3
        0,      0.608f,     // 4
        0.165f, 1,          // 5
        0.606f, 1,          // 6
        0.575f, 0.420f,     // 7
        0.575f, 0.643f,     // 8
        0.740f, 0.643f,     // 9
        0.740f, 0.420f      // 10
);
The Triangles
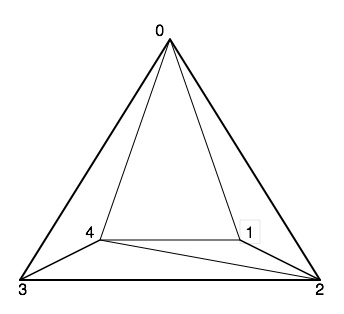
To view our pyramid we need to break it up into a number of triangles which the graphics card can render on our screen. Our pyramid has 6 triangle, 4 making up the sides and 2 to make the base we must define each of these triangles by providing the 3 vertices (V0, V1, and V2) and the 3 corresponding texture coordinates (T0, T1, and T2) so that the graphics card can render thus converting a 3D scene to a 2D display.
The vertex and texture data is stored in an array in the following arrangement :-
V0, T0, V1, T1, V2, T2
In computer graphics the humble triangle has two sides, FRONT and BACK. In the pyramid I want all the triangles to have their fronts facing outwards and their backs facing inwards. Consider the pyramid side facing us, it is defined by the three vertices 0, 2 and 3 if we order these in an anti-clockwise direction [0, 3, 2] then we are looking at the FRONT of the triangle, if a clockwise direction [0, 2, 3] then we are looking at the BACK of the triangle. So looking at our pyramid the six triangles are defined by the vertices
[0, 3, 2] [0, 2, 1] [0,1, 4] [0, 4, 3] [4, 2, 3] [2, 4, 1]
Now include the text coordinate data and we can add this information to our mesh with -
mesh.getFaces().addAll(
        0, 0, 3, 5, 2, 6, // Front face
        0, 0, 2, 2, 1, 3, // Right face
        0, 0, 1, 1, 4, 2, // Back face
        0, 0, 4, 4, 3, 5, // Left right face
        2, 9, 3, 8, 4, 7, // Bottom face
        2, 9, 4, 7, 1, 10 // Bottom face
);
Material
Now we need to create the material for the the pyramid surface with -
PhongMaterial material = new PhongMaterial();
material.setDiffuseMap(new Image("images/buildings1.png"));
The Mesh View
Finally we get to creating the mesh view for our pyramid.MeshView pyramid = new MeshView(mesh);
pyramid.setDrawMode(DrawMode.FILL);
pyramid.setMaterial(material);
and that's it, we have our pyramid.
What next?
This is only an introduction to the whole area of 3D graphics so I suggest that you download this project and experiment with the code. If you feel up to it I would encourage you to create a class called Pyramid to simplify the creation of multiple pyramids. If you do make sure your Pyramid class inherits from MeshView.